


Happy + Healthy New Year, guys!
Lets start 2014 with some kefir love :)
If you haven’t tried kefir yet, maybe you’ll consider giving it a chance this year (or this weekend).
Kefir is a fermented dairy beverage, traditionally made by using kefir “grains” to culture ruminant milk. There is commercial kefir on the market, and several ways of making your own. Over the past year and a half I’ve been having some fun with my grains, experimenting with different environments, milks, and kefir recipes. I’d like to share some of my personal experiences and the best online resources to help you get started experimenting with your own.
Kefir “grains”? Sound Weird.
Totally weird. I like to think of them as little magic workers that help transform milk from something that I don’t really drink into liquid goodness. They make milk more nutritious by pre-digesting lactose, providing a valuable source of gut-friendly probiotics, and synthesizing vitamins.
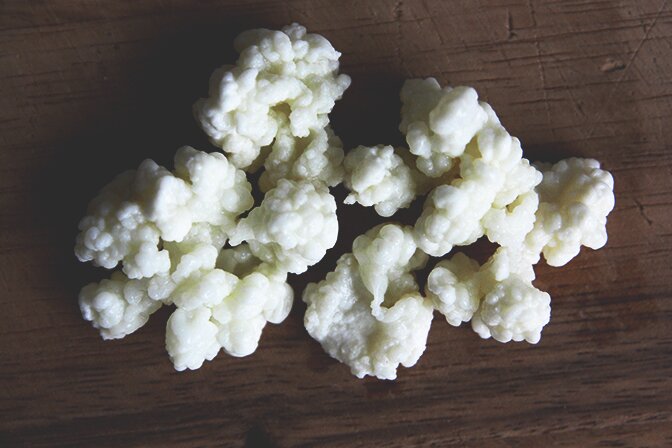
Kefir grains are not actually grains at all, but little gelatinous masses of bacteria and yeast held together by a polysaccharide matrix. They resemble little clumps of cottage cheese, or mini cauliflower florets. I know… sounds appetizing. Stay with me.
An army of good guys
Kefir is an incredible (and affordable) source of probiotics. This journal article (PDF) lists 42 species of bacteria and yeast identified in kefir grains. 42!! and I’ve seen sources that list even more. They note that the strains in the final product vary quite a bit, as its difficult to get consistent results with so many variables in the fermentation process. But even if not all of them end up in your kefir, that’s way more diverse than any yogurt or even probiotic supplement.
I have yet to come across commercial kefir that uses grains to make their product. They usually use around 10 strains of bacteria and yeast to mimic the flavour of true kefir. While it’s still great to consume, you may not be getting the full probiotic benefit.
Making kefir in the fridge – a pleasant surprise!
Fact about kefir: It is normally cultured at room temperature. Unlike yogurt, which needs a warm environment, kefir does best at the same temperature as we do. Big points for an easy fermentation process.
But here’s something that I’ve discovered that makes life even easier: culturing in the fridge works too, and in my case, even better than at room temperature. I get a creamier, more consistent, and tangier drink + the longer fermentation cycle is a lot more convenient for my frequency of consumption.
The normal room temperature culturing window is about 18 – 48 hours, while my fridge window is 5 – 10 days. I’ve even left it there for over two weeks while on vacation and came home to some delicious + extra tangy kefir.
Many sources discourage this process, claiming that this isn’t healthy for the grains and you run the danger of spoiling your milk before it has time to properly culture.
While this may be true, I personally have not come across either of these issues. I make sure to do a few fermentation cycles at room temperature every couple of months, and my grains have been going strong for over a year using this method. No spoiled milk either. Perhaps this process yields a less diverse probiotic spectrum – I don’t know. Wish I had a mini science lab to find out.

Other Milks + The Best Smoothie ingredient
Not into cow’s milk? You can still make kefir.
Although you will still need to “refresh” the grains in cow’s milk occasionally to keep them healthy, other milks work well too.
My favourite smoothie ingredient is coconut milk kefir. A spoonful of it goes a long way in adding probiotics and creaminess to any smoothie, and I find that it lasts forever in the fridge.
Note that coconut milk should be cultured at room temperature because keeping the grains in coconut milk for an extended period of time in the fridge can starve them of their natural (dairy milk) environment.
Since kefir grains do live in dairy milk, be very careful if you have a serious dairy allergy, as traces of milk proteins may end up in your coconut kefir.
I’ve also had great results culturing sheep’s milk, goat’s milk, and heavy cream for an an interesting take on tangy creme fraiche.
3 Ways to make Kefir
But there’s only one way to make true kefir…
1. Use traditional grains: The best way to make kefir is to use the grains. There are many places you can get them, and once you start with your own, a great benefit is that you can share them with family and friends.
If you can’t find someone to share with you, or a local source (I got mine at the farmer’s market), here are some online sources for true kefir grains:
- Cultures for Health Online Store
- Yemoos Online Store
- : Search for “milk kefir”- there are many sellers!
- – an active community with lots of people willing to share and trade cultures.
Cultures for Health has some fantastic instructions:
Jan 5th Update: Try promo code CULTURES10 for a 10% discount on any of the Cultures for Health products. Something useful from a Facebook ad :)
Now for “almost kefir”…
2. Use a starter culture: If taking care of grains is not an option, you can use a starter. While you may miss out on some of the probiotic strains of true kefir, a starter is a lower maintenance option for making kefir at home. Check your local health food store and the sources above for starter cultures. They’ll include instructions for making kefir.
Keep in mind that even though there’s usually a big price difference between grains and starters, grains will last forever if properly taken care of, while starter cultures have a limited lifespan and can only re-culture milk several times before needing replacement.
3. Use commercial kefir as a starter – I did this for a while before finding grains and it yields a product similar to the commercial kefir that it was cultured from. Like the starter, you’ll occasionally need some new kefir, but you can get quite a few cycles by saving some of each batch to start a new batch.
The benefits of this method over purchasing commercial kefir are that you can dilute any additives that are commonly found in commercial kefirs, you can use organic milk if organic kefir is not available, and milk is often cheaper than commercial kefir, making kefir more affordable.
But be careful with this method…
Depending on the commercial kefir you use, you may not have enough viable bacteria to properly culture another batch and end up with spoiled milk instead. This is actually a great way to test the quality of the kefir you’re buying. The good stuff should be able to culture a new batch without any problems. It’s really important to know what kefir is supposed to taste like so you can easily identify a good batch from a spoiled one. While your re-cultured batch may not taste exactly the same, it should taste good and tangy.
For this method: Pour about 1 cup of fresh milk over 1 Tbsp. of kefir (you can scale this up), cover with a cloth or paper towel, and let it sit on the counter until thickened (usually 18 – 24 hours). Refrigerate :) Easy as that!
The best online resources
- Cultures for health e-book: This is incredible. 150+ pages of instructions, invaluable tips, and tons of recipes! You have to sign up to their mailing list for free access. They’re not spammers, it’s worth it. The whole site is a wealth of knowledge about anything fermentation-related.
- For the science nerds: Kefir: A symbiotic yeasts-bacteria community with alleged health benefits
- Dom’s kefir page: This is a classic. A little hard to read but full of great stuff.
- Once you’re rockin’: 80 + ways to use milk kefir
- Some of my recipes that use milk kefir: Frisee Salad with Tangy Kefir Dressing, Saskatoon Berry Bowl w/ Kefir Creme Fraiche, Honey-Basil Avocado + Kefir Smoothie, Spiced Pear + Buckwheat Pancakes
- For the Chris Kresser fans: Kefir – the not-quite-Paleo superfood
I hope that you found this information useful! If you’re still a little skeptical about the weirdness of kefir grains, please leave a comment or e-mail me your questions.
I would also love to hear about your favourite resources and communities. Leaving links in the comments may set off the spam alarm, so feel free to email them to me. I’ll update the article with more tips + resources.
Happy Culturing!
Notes & Disclaimers
The information in this post is based on articles I’ve read and my personal experiences. The nutritional information is not intended as medical advice. Please see your health care professional with any concerns about consuming kefir.
The links and resource recommendations are not sponsored. They are truly the best resources that I’ve found on the web and I have not been paid to promote them.
Oh WOW…I’ve been picking up kefir from the grocery store for smoothies lately. I didn’t realize how easy it was to make on your own. I’m surfing around the cultures for health website now. I think I am going to pick up some grains to give it a try! Thanks for all the great info :)
Yay! Glad to inspire some kefir action :) It takes a little trial and error to get the grains working well in your environment, but I think you’ll love being able to make your own.
Kefir sounds really good, but I’ve never tried it since I can’t drink milk. It’s good to know that you can make it with coconut milk instead! I have friends that make kefir and are always trying to give grains away. I will have to try this!
Thanks for your comment, Brianne :) Be careful if you have a serious dairy allergy – since the grains normally live in dairy milk, there might be a chance that traces of dairy proteins end up in the coconut kefir. I really hope the coconut kefir works out for you!
Fantastic article! Kefir is an amazingly healthful food! I have been able to heal up my gut by drinking it everyday for the past 2 years. I haven’t been able to make it myself yet because I don’t have time but I would love to eventually! Have you heard Jordan Rubin’s (the Author of The Maker’s Diet) story? He healed himself of Crohns disease and now has his own company and sells old world style Kefir. Here is a link to an article and video by Jordan about his Kefir. Check it out:
http://trylivingorganic.com/2012/03/27/amasai-beyond-organic/#more-725
I have issues digesting lactose and I have never had any problems digesting Beyond Organic’s kefir or hard RAW cheeses! This stuff is amazing!
Hi Paul. Thanks for sharing your story and link. Glad to hear that kefir has helped you heal and that you’re okay to consume it despite the lactose intolerance.
I’ve never seen Amasi before (not available in Canada?) but it looks like a really great product. Great to see it’s made with grass fed cow’s milk and cultured with a high variety of strains (vs. the 10-ish that we usually see).